Obsidian Publish Alternative, How to One-click Upload Your Notes on Your Own Website
In this post, I'll explain how I managed to publish my notes to my own website automatically, just like Obsidian-Publish would do.
This post is an extension of my main post showcase of my Obsidian workflow. You might want to check it out as well.
Create You Own Hugo Website
Prerequisites
I'll assume that you installed Hugo following their quick-start documentation and Git on your computer, and that you know how to clone a repository from Github. If not, Google and Chat GPT are your friends here.
Create Your Website Repository on Github
First thing you need to do is to create your website repository on Github.
Name it website_name.github.io with website_name being your desired website name. (Thanks captain obvious).
Don't forget to tick the Add a README file. It will prevent cloning an empty repository that will lead to issues if you're not comfortable with Git.
Create Your Website on Local
You'll now head to a folder of your choice on your computer.
I'm simply using my documents folder inside my home in Ubuntu. But you might use Documents in Windows or anything else.
Open a command prompt inside this folder. Using Windows Terminal you should be able to right click inside the Documents folder and select Open in terminal. Or use the cd command to navigate to the right folder. If you're a Linux user, I'll assume that you know what you are doing.
Input the following command :
Then to get inside the newly created website folder :
And you'll now add your Hugo website template as a git submodule.
There's other ways of installing a theme, I just made a choice :
- Using the theme quick-start → Usually end up being hard to configure
- Using a simple git clone instead of a submodule → It'll be a pain to update the theme
- Using a Hugo module → Configuration involves creating folder, I'm a lazy ass, I'm configuring my theme directly from my theme folder.
By the way, if you want to be able to modify the theme, you should fork the theme, and update the .gitmodules file with your forked repository link. If not, just keep it this way with the official hugo-theme-stack repository.
If you do choose to use the git submodules for being able to modify the website theme, please don't forget to use the git submodule update --remote command to gather the changes from your remote fork.
Anyway, now you should find the hugo.toml file and delete it. Don't worry, we'll use the theme configuration file.
Speaking of which, copy the whole exampleSite folder content at the root of your website_name folder.
You'll now have a config.yaml configured correctly, meaning with the good theme and all the base configs. You can also steal mine. I don't really mind, if anything, it'll make me happy to see websites created thanks to my guide.
Just don't forget to change at least the baseurl to https://website_name.github.io/ and your website title.
Please make sure to add the following two lines to your config.yaml as well :
# Error handling configuration for internal markdown link not found
refLinksErrorLevel: WARNING
refLinksNotFoundURL: https://website_name.github.io/404
They will assure that your website still build even if you push a note that has a link to an un-uploaded note, and redirect to your 404 page if it doesn't find the requested URL.
Icons and avatar are saved inside the assets folder. Except for your website favicon that goes into the static folder.
You will now come back to your Documents folder and git clone your previously created repository. You now have a website_name folder containing your Hugo site folder with the theme as a git submodule. And a website_name.github.io folder containing a README.md file.
You just need to copy the website_name folder content inside your repository folder named website_name.github.io. And finally, commit and push !
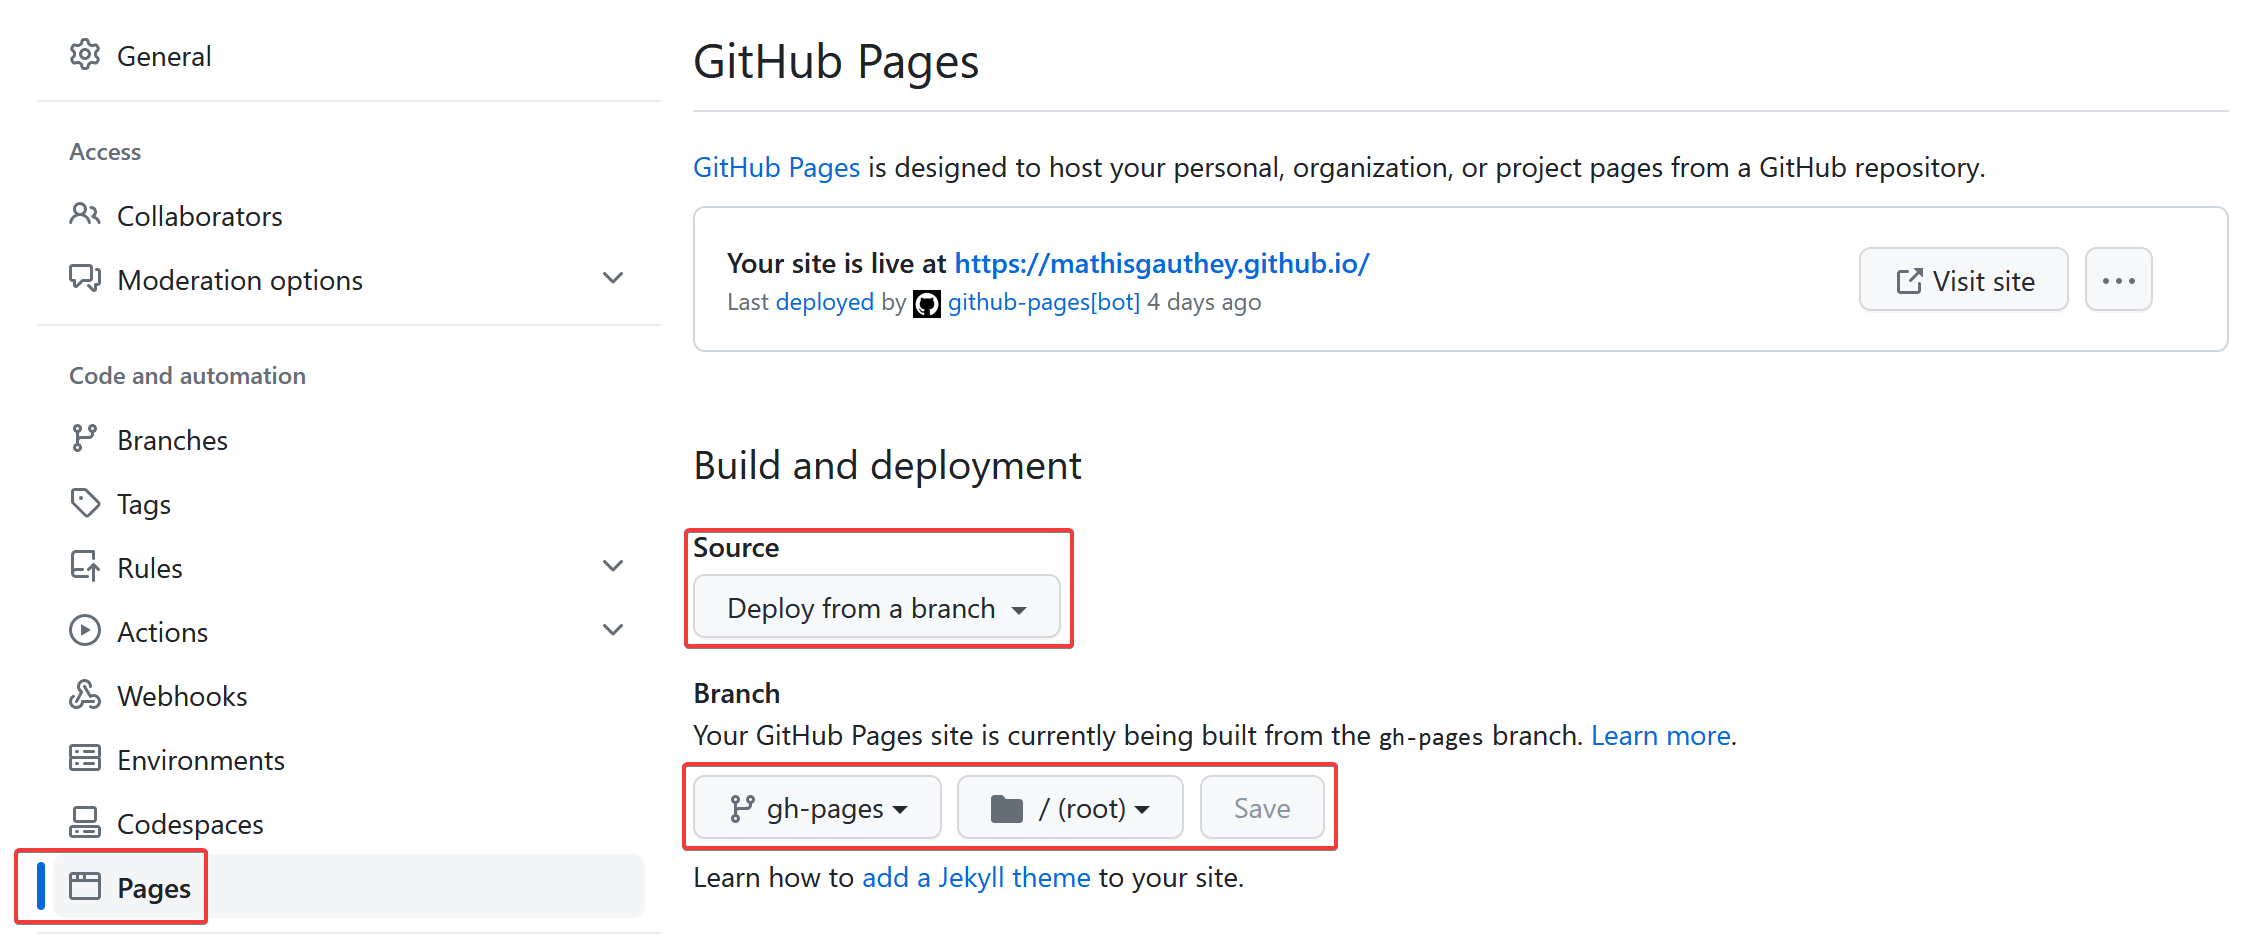
Configuring the Github Pages Online Part
First, you need to go to your website settings and configure how the site is build.
Then create a .github folder.
Inside the folder, create a workflows folder.
Finally, create a deploy.yml file. Add the following content :
name: Deploy to Github Pages

on:
    push:
        branches: [main]
    pull_request:
        branches: [main]

jobs:
    build:
        runs-on: ubuntu-latest

        permissions:
            # Give the default GITHUB_TOKEN write permission to commit and push the
            # added or changed files to the repository.
            contents: write

        steps:
            - uses: actions/checkout@v2
              with:
                submodules: 'recursive'

            - name: Cache Hugo resources
              uses: actions/cache@v2
              env:
                  cache-name: cache-hugo-resources
              with:
                  path: resources
                  key: ${{ env.cache-name }}

            - uses: actions/setup-go@v2
              with:
                  go-version: "^1.17.0"
            - run: go version

            - name: Cache Go Modules
              uses: actions/cache@v2
              with:
                  path: |
                      ~/.cache/go-build
                      ~/go/pkg/mod
                  key: ${{ runner.os }}-go-${{ hashFiles('**/go.sum') }}
                  restore-keys: |
                      ${{ runner.os }}-go-

            - name: Setup Hugo
              uses: peaceiris/actions-hugo@v2
              with:
                  hugo-version: "latest"
                  extended: true

            - name: Build
              run: hugo --minify --gc

            - name: Deploy 🚀
              uses: JamesIves/github-pages-deploy-action@4.1.4
              with:
                  branch: gh-pages
                  folder: public
                  clean: true
                  single-commit: true
It is based on the hugo-stack-theme-starter repository, but configured to use a git submodule by adding the lines 20 and 21 :
If you don't know much about Github workflows, just keep in mind that this is the part that will automatically build your site from your main branch on Github and deploy the gh-pages branch that is the built website.
Configure Your Website
I honestly don't have the time nor the will to document every modification I made on my website. You have many options to learn how to do so :
- Explore my website repository and files
- Explore the hugo-theme-stack repository, its issues and discussions
- Explore the hugo-theme-stack documentations
Basically, I changed and added some icons, added some left panel pages, and configured a comment section using giscus.
Upload Content to Your Website
You can simply change the share boolean to true in the note frontmatter, then select the command Upload filename to DEFAULT of the obsidian-github-publisher plugin from the note drop down menu. It will use some regex to convert wikilinks to standard Hugo links, commit and push to the relevant repository on Github, make a pull request that'll be automatically accepted, and then use some Github Actions to build your website.
Attachments are automatically sent as well as linked notes as long as they have the share boolean set to true as well.
The posts will be sent to the content/post folder and the attachments to the content/images folder.